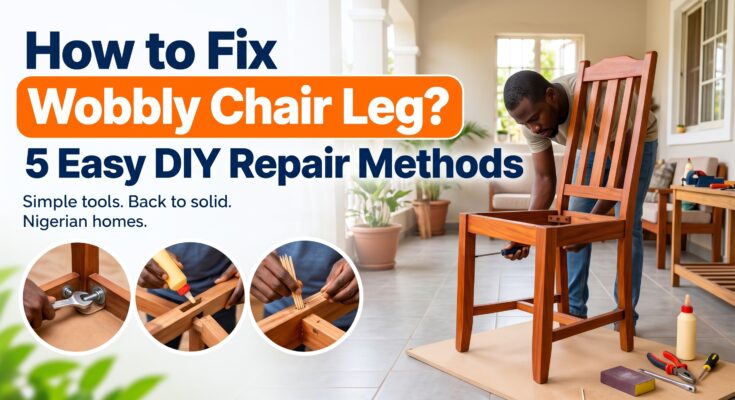
A dining chair, study desk chair, or wooden armchair rarely collapses without giving you plenty of warning first. The trouble almost always starts with a faint creak when someone leans back after a meal, followed by a slight side-to-side sway. Catching that movement early and knowing how to fix a wobbly chair leg before the timber splits will stop a single loose corner from putting destructive leverage on the other three legs.
Nigeria’s sharp seasonal weather shifts are brutal on wooden furniture. Throughout the rainy months from May to October, indoor humidity stays high and timber frames absorb moisture from the air, swelling tightly inside their sockets. When the dry, dusty Harmattan wind rolls in around December, the wood rapidly loses moisture and shrinks. After two or three cycles of swelling and shrinking, brittle factory glue cracks apart and metal bolts back right out of their threads.
Whether you are repairing a locally built mahogany, teak, or gmelina dining chair from a neighbourhood carpentry shed or an imported flat-pack chair held together with Allen bolts, you can make the frame rock-solid again using basic supplies from any hardware shop.
Pinpoint Why the Chair Is Rocking Before You Touch a Tool
Squeezing fresh glue into an uncleaned joint or sawing five millimetres off a chair leg before checking the floor is the fastest way to ruin a good piece of furniture. Set the chair on a flat section of your parlour floor and run through these four quick checks:
- Rule out an uneven floor tile first: Slide the chair across two or three different tiles in the room. If a chair only rocks in one specific spot, you have a sunken floor joint rather than a broken chair.
- Flip the chair upside down on a table: Grip each leg one by one and push it firmly inward and outward. Watch the exact seam where the top of the leg meets the horizontal seat rails (the apron) and the lower cross-bars (stretchers).
- Identify the joint style: Look underneath the four corners of the seat cushion. Modern dining chairs usually use a diagonal wooden corner brace held by a central hex nut or Allen bolt. Traditional local carpentry chairs use mortise-and-tenon or round wooden dowel joints glued directly into the frame.
- Check for stripped screw holes or split grain: Look for fine sawdust Trickling out of screw holes or a diagonal crack running through the wood grain itself.
Quick Diagnostic Table: Match the Symptom to the Right Fix
| What You See Underwater | Underlying Problem | Best Repair Method | Active Work Time |
| Whole leg shifts at the top corner; hex nuts or Allen bolts are visible | Loose hanger bolts or missing lock washers | Method 1: Square the frame & lock the nuts | 15 minutes |
| Wood screws in the corner brace spin endlessly without biting | Stripped internal wood threads inside the frame | Method 2: Pack hole with hardwood splinters & PVA glue | 20 minutes (+30m set) |
| Round wooden spindles or flat tenons slide in and out of their holes | Dried-out factory glue bond | Method 3: Scrape old glue, shim & reglue | 45 minutes (+24h cure) |
| All joints are tight, yet one leg hovers 3–5 mm off a flat floor | Missing foot glide or warped leg | Method 4: Add a matched felt pad or nylon nail glide | 10 minutes |
| Heavy daily-use chair keeps loosening at the seat rail | Shallow corner block or weak softwood rail | Method 5: Reinforce discreetly with steel L-brackets | 25 minutes |
Workshop Safety Rules
- Inspect load-bearing legs for diagonal grain splits: If a back chair leg is cracked right across the timber grain rather than just loose at the joint, glue alone will not hold an adult’s weight safely. Take a split leg to a local carpenter to have a fresh piece of seasoned hardwood milled.
- Protect your eyes and hands: Wear safety glasses when scraping brittle old glue or trimming hardwood pegs, just as we stress wearing protective eyewear in our guide on 3 Ingenious Ways to Cut Glass Without a Glass Cutter.
- Never hit bare furniture legs with a steel hammer: Always tap joints apart using a rubber mallet, or hold a scrap block of soft wood wrapped in a folded cloth against the rail so you don’t bruise the varnish.
- Give PVA glue a full 24 hours before sitting: White carpenter’s wood glue skins over in an hour, but sitting on the chair before the internal bond cures overnight will shear the wet glue bond immediately.
Method 1: Tighten Loose Corner Bolts (And Stop Them Backing Out Again)
Most upholstered dining chairs sold in furniture showrooms attach each leg using a diagonal hardwood block under the seat. Two threaded steel studs (hanger bolts) protrude from the top of the leg, pass through the corner block, and tighten down with hex nuts. Every time someone drags the chair backward across floor tiles, the leg twists slightly until the nut works loose.
Tools and Supplies Needed
- 10 mm, 12 mm, or 13 mm spanner (or matching Allen key)
- Phillips and flathead screwdrivers
- Missing flat washers and split spring washers (₦50–₦100 each at any bolt dealer)
- Blue threadlocker drop (or a tiny dab of clear nail polish / second lock-nut)
Step-by-Step Repair
- Peel back the corner dust fabric: Turn the chair upside down on an old blanket. If thin black non-woven fabric hides the underside of the seat, use a flathead screwdriver to pry out three or four staples right at the loose corner and fold the flap back.
- Tighten the outer wood screws first: Before touching the big centre bolt, check the four wood screws holding the diagonal corner block to the side rails of the seat. Snug them down firmly with a screwdriver.
- Add missing washers: Check whether the builder put a flat metal washer and a split spring washer underneath the hex nut. Without a flat washer, the nut chews straight into the wood fibres and loosens again within a week.
- Square the legs on the floor before final torque: Finger-tighten the nuts until the leg barely wiggles, then flip the chair upright onto a flat floor. Press firmly down on the centre of the seat cushion with one hand so all four feet plant squarely on the tile.
- Lock the nut in place: Reach underneath with your spanner and turn the nut a quarter-turn at a time until snug—do not wrench so hard that you pull the steel stud out of the wooden leg. To stop the nut from ever vibrating loose again, spin a second thin hex nut (jam nut) right onto the threads behind the first nut, or dab a drop of blue threadlocker onto the threads before tightening. Staple the black fabric flap back down.
Method 2: Rebuild Stripped Screw Holes in Wooden Frames
When a wood screw inside a corner brace or seat rail spins round and round without getting tight, the metal threads have chewed out the soft wood walls inside the hole. Putting in a massive bolt often splits the narrow wooden rail in half. Instead, pack the stripped hole with glued hardwood fibres.
Tools and Supplies Needed
- PVA carpenter’s wood glue (such as Topbond or Titebond—avoid rubber contact cement like Evo-Stik or super glue)
- Bamboo suya skewers, round wooden toothpicks, or shaved hardwood splinters (avoid soft matchsticks, which crush too easily)
- Sharp utility knife or side cutters
Step-by-Step Repair
- Unscrew the spinning fastener and tap out all loose wood dust from the hole.
- Coat 3 to 5 bamboo skewer strips or toothpicks thoroughly in PVA wood glue, and use one toothpick to smear glue around the inside walls of the hole.
- Pack the hole tightly: Push the glue-coated skewers into the hole one after another, tapping the last one gently with your screwdriver handle until the hole is completely wedged full of wood.
- Cut flush and let firm up: Snip the protruding wooden ends flush with the surface using wire cutters or a utility knife. Let the glue set for 30 to 45 minutes.
- Drive the original screw straight into the centre: The screw threads will bite into the new bamboo and glue core, expanding it tightly against the surrounding frame.
Method 3: Disassemble, Scrape, and Reglue Loose Wooden Joints
Traditional carpentry chairs rely on round wooden dowels or rectangular mortise-and-tenon pegs pushed into carved sockets. When a joint starts sliding in and out, many homeowners simply squirt fresh white glue into the crack and push it shut. Within three days, the joint pops right back open.
Why? Because dried carpenter’s glue will only bond to raw wood fibres—new wood glue cannot stick to cured old glue.
Tools and Supplies Needed
- PVA wood glue
- Narrow wood chisel, flathead screwdriver, or dull pocketknife (for scraping old glue)
- 120-grit sandpaper
- Thin cotton cloth strip or wood veneer shaving (if the peg fits loosely in the socket)
- Strong nylon rope and a short wooden stick (to make a tourniquet clamp if you don’t own long bar clamps)
Step-by-Step Repair
- Label the parts with masking tape: Before pulling any rails apart, stick numbered pieces of masking tape (
Front-Left,Back-Right) on each joint so you don’t mix up the angles during reassembly. - Tap the loose joint apart: Gently rock and tap the loose rail out of its socket using a rubber mallet or a padded block of wood. Do not force glued joints on the opposite side of the chair if they are still rock-solid; only open the failed assembly so the joint can clear cleanly.
- Scrape away 100% of the old crusted glue: Use the edge of a chisel or knife to flake off every bit of yellow or white dried glue from both the projecting wooden peg (tenon) and the inside walls of the hole (mortise), then wrap a strip of 120-grit sandpaper around a pencil to clean the socket walls down to bare timber.
- Fix a sloppy, loose-fitting peg: Push the dry joint together to test the fit. If the wooden peg rattles loosely inside the hole, wood glue alone will not fill the gap (PVA glue shrinks as it dries). Drape a single layer of thin cotton fabric soaked in wood glue over the end of the peg—or glue a paper-thin shaving of wood veneer along one cheek of the tenon—so it requires firm hand pressure to push home.
- Coat both surfaces and clamp with a rope tourniquet: Brush a thin, even layer of PVA glue inside the hole and around the peg. Push the joint firmly together, set the chair upright on a flat tiled floor to make sure all four legs touch evenly, and wipe away squeezed-out glue with a damp rag.
- Apply clamping pressure for 24 hours: Loop a strong nylon rope twice around the two chair legs, tie it snug, slip a 20 cm wooden stick between the two strands of rope, and twist the stick like a propeller until the rope pulls the joint tightly together. Lock the stick against the stretcher bar and leave the chair untouched for a full 24 hours.
Method 4: Level a Chair That Rocks on a Flat Floor
Sometimes every bolt and glue joint on a chair is tight, yet one leg sits 3 to 5 millimetres shorter than the other three, causing an annoying diagonal clack every time you sit down.
Instead of sawing the other three legs shorter—which is easy to mismeasure and leaves raw wood exposed to wet mop water—build up the single short leg:
- Measure the exact gap: Place the chair on your flattest floor tile, press down on the seat so three legs rest on the floor, and slide stackable coins or cardboard strips under the floating fourth leg until the rocking stops completely.
- Install a matching nail-on nylon glide or felt pad: Flip the chair over and inspect the bottom of the feet. Often, the short leg simply lost its plastic floor glide. Buy a set of four tap-in nylon furniture glides (₦500 per pack at hardware stores), and slip one or two thin metal washers onto the nail shaft of the short leg’s glide before tapping it into the centre of the foot so all four legs sit dead level. This also protects your parlour floor after doing a deep restoration like our guide on How to Clean and Seal Floor Tiles.
Method 5: Reinforce Heavy-Duty Chairs with Hidden Steel L-Brackets
If you have a dining chair where the wooden corner blocks have cracked or the tenon pegs have broken short inside the leg, glue alone won’t keep the rail from twisting.
Pick up four 50 mm × 50 mm zinc-plated steel L-brackets (angle irons, around ₦300–₦500 each) and short 20 mm wood screws from a local hardware shop. Flip the chair upside down, tuck the steel L-bracket high up inside the inner corner where the seat apron meets the square top of the leg (so it remains completely invisible when standing in the room), drill small 2 mm pilot holes so the hardwood doesn’t split, and drive the screws tightly home.
(Working on your matching dining table next? Check out our complete restoration walk-through on How to Refinish an Old Wooden Table.)
Frequently Asked Questions
Why shouldn’t I use super glue or Evo-Stik contact cement on a wooden chair leg?
Super glue (cyanoacrylate) is brittle and snaps like glass the moment someone leans back and puts shearing force on a chair joint. Contact adhesive (Evo-Stik) stays soft and rubbery, allowing the wooden peg to creep slowly out of the socket. Always use PVA carpenter’s wood glue or two-part epoxy, which penetrate deep into the wood pores and cure harder than the timber itself.
How do I stop chair legs from rotting or swelling when mopping tiled floors?
Bottom chair feet are cut across the end-grain, which sucks up dirty mop water like a bundle of tiny drinking straws. Sand the bottom footprint of each leg smooth, brush on two coats of clear polyurethane varnish or dab a thin film of candle wax over the bottom face, and tap in plastic nail-on glides to keep the timber 3 millimetres off the wet floor.